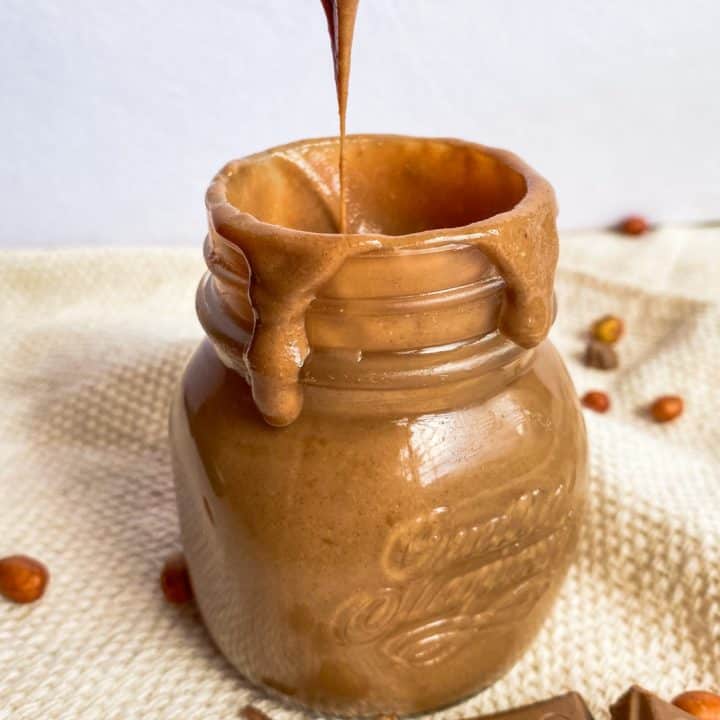
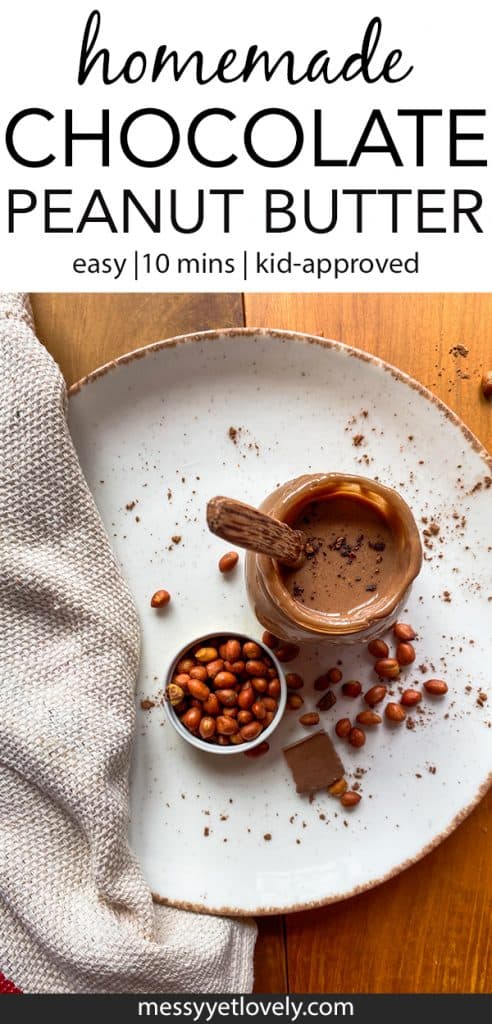
Homemade chocolate peanut butter recipe
And the best thing?
It takes only 10 minutes to make this creamy homemade chocolate peanut butter.
I am a huge lover of chocolate and on some days, I just have to have chocolate. And my kids love anything with chocolate too.
I use this chocolate peanut butter mainly as a spread on whole-grain bread as a school snack for kids. It gives them the protein they need and is filling too.
Peanut butter has many health benefits. Approximately 26% of peanuts are protein. Therefore it is a great source of plant-based protein. In addition to protein, peanuts also contain carbohydrates, fiber, vitamins and minerals such as magnesium, potassium, and zinc.
It is best to consume peanut butter in moderation due to its high-fat content. Even though it contains unsaturated healthy fat, moderation is key.
So back to our recipe.
Making peanut butter at home has many benefits.
- It is cheaper than the store-bought ones
- You can choose the ingredients and their quantity
- You can whip up a batch when you have 10 minutes because that’s all the time it takes
- The biggest benefit I like is that you can make it “chocolaty”
Normally you can use a food processor to make nut butter. As of now, I don’t own a food processor. So I use a blender. Fortunately, my blender is strong enough to make nut butter.
The texture of homemade peanut butter is different from a commercial store-bought one. Store-bought ones are thicker while a peanut butter made from scratch is a bit on the runnier side.
The upside is that it is ready to be used as a spread as soon as you take it out from the refrigerator.
**This post contains affiliate links. I may receive a small commission at no extra cost to you if you make a purchase through my affiliate link**
HOW TO MAKE CHOCOLATE PEANUT BUTTER WITH COCOA POWDER
- Start by adding peanuts to the food processor. Only peanuts and no other ingredient should be added now.

You will hear a loud noise in the first few seconds as peanuts start to break into pieces.
Then you can see that the peanuts get powdered.
2. Process/blend for a few minutes and you can see that it starts to come together and starts to get creamy, like in the following picture.

3. Process till it softens and you can see that it gets to a point where the peanuts turn into a creamy and soft butter. For me, the whole process took approximately five minutes.

4. Now you can add salt, sugar (or the sweetener you prefer), and cocoa powder and process again for 1-2 minutes until all the ingredients are well-incorporated.
Note: Please don’t add cocoa powder or any other ingredient before you get the creamy texture of peanut butter. When I first made it, I added cocoa powder before it turned creamy and smooth as shown in the picture. And then it failed to process more. I cannot say that it was a total failure because I then turned it into chocolate peanut butter balls 🙂
If you bought roasted peanuts and if it is salted, you don’t need to add salt in this step. Along with salt, you can add cocoa powder and brown sugar.
I added sugar because I like it sweet. If you don’t want to add sugar, skip sugar too. But if you want some sweetness and keep it healthy at the same time, feel free to add honey or dates.
I plan to try other healthier alternatives next time, and I will update here when I do.
Process the mixture again until all the ingredients are completely blended.

I added only 1 tablespoon of cocoa powder because I don’t like the bitterness of too much chocolate. Start with 1 tbsp, and if you want a more rich flavor of chocolate, add more cocoa powder.
Transfer the chocolate peanut butter into a glass jar or any other container you have handy.
For me, this batch filled a 125 ml mason jar to the brim, plus half of another jar of the same size. (125 ml ~ 4.23 U.S fluid ounce).

Since it is homemade and preservative-free, I prefer to store this butter in the refrigerator. The texture of this homemade peanut butter is runny and smooth.
In the refrigerator, it can solidify a little bit more. But I didn’t experience any problem in spreading it onto bread immediately after taking it out of the refrigerator. I have never had to keep it out for softening.
And that’s what I love about this peanut butter. Even if I forget to keep it out for softening I can use it as a spread immediately after taking it out from the fridge, to pack for my kid’s snack box.
I estimate it has a shelf-life of at least one month in the refrigerator.
You can use this nut butter in smoothies, with bagels, pancakes, sandwiches and wherever your creativity lets you add it to.
Or like I do, you can steal a spoon or two after your kids are asleep, to satisfy that late-night chocolate craving. Yum!
Homemade chocolate peanut butter
This chocolate peanut butter is prepared using cocoa powder and can be made in 10 minutes. It is yummy, creamy and smooth. This recipe requires only 4 ingredients that are comonly available in your home.
Ingredients
- 2 cups unsalted roasted peanuts
- 1/8 tsp pink salt (can use normal salt as well)
- 1 tbsp unsweetened cocoa powder
- 1/4 cup brown sugar (can substitute with honey or dates)
Instructions
- Add the roasted peanuts to the food processor and process for about 5 minutes.
- The peanuts will first become powdered and then it will start to come together as a ball. Scrape down the sides if needed.
- Next, the ball will break and it starts to get creamy.
- Keep processing for 1-2 minutes more, until it becomes smooth and reach the desired consistency.
- Then add salt, sugar and cocoa powder. I added only 1 tbsp of cocoa powder since I don't like the bitterness of chocolate. If you want a richer flavor, you can start with 1 tbsp and add more according to your taste.
- Process for 1 or 2 minutes more until the mixture is smooth, creamy and all the ingredients are well incorporated.
- Transfer the peanut butter into a glass jar. Store it in the refrigerator. I estimate it could stay good for at least one month in the refrigerator. It has a runny texture (not too runny, you can use it as a spread), therefore it is easy to spread it on a bread immediately after taking it out from the refrigerator.
- If you don't use honey for sweetening, recipe is vegan and also, kid-friendly.
Notes
Add salt, sugar and cocoa powder only after the peanuts have turned creamy and smooth.
Recommended Products
As an Amazon Associate and member of other affiliate programs, I earn from qualifying purchases.


Nutrition Information:
Yield: 6 oz Serving Size: 1Amount Per Serving: Calories: 318Total Fat: 24gSaturated Fat: 4gTrans Fat: 0gUnsaturated Fat: 18gCholesterol: 0mgSodium: 52mgCarbohydrates: 18gFiber: 4gSugar: 10gProtein: 12g
Nutritional information for the recipe is provided as a courtesy and is approximate only. We cannot guarantee the accuracy of the nutritional information given for any recipe on this site.
- Chia pudding recipe (3 delicious flavors)
- 28 healthy Christmas snack ideas the whole family will love!
Want to save this recipe for later? Pin it to your recipe board!


Educating but, can one use sweetened Cocoa powder like Milo,Bournvita etc from the stores?
Hi!
I have never tried those. But I think you can use them. The taste will be different from that of normal cocoa powder.