Spring Closet Cleaning Checklist (6 simple steps to a fresh closet)
If your closet feels full but somehow nothing feels right to wear, it’s time for more than a quick tidy-up.
A proper spring cleaning checklist for closets is not about rearranging hangers.
It’s about clearing space, evaluating what you actually use, and rebuilding your closet so it supports your real life. I have already written a post on how to do a spring closet cleanout and reset.
This post is a checklist that complements my Spring Closet Cleanout guide. This one focuses on the practical, step-by-step cleaning and organizing process.
If you want deeper reflection questions to help you decide what to let go of, read my Spring Closet Reset guide as well.
This checklist walks you through the process step by step. It has no vague advice.
Or aesthetic-only organizing.
I believe in practical, functional actions that make getting dressed easier and prevent unnecessary shopping later.
If you work through each section in order, by the end, your closet will feel lighter, calmer, and far more intentional.
So, shall we begin?
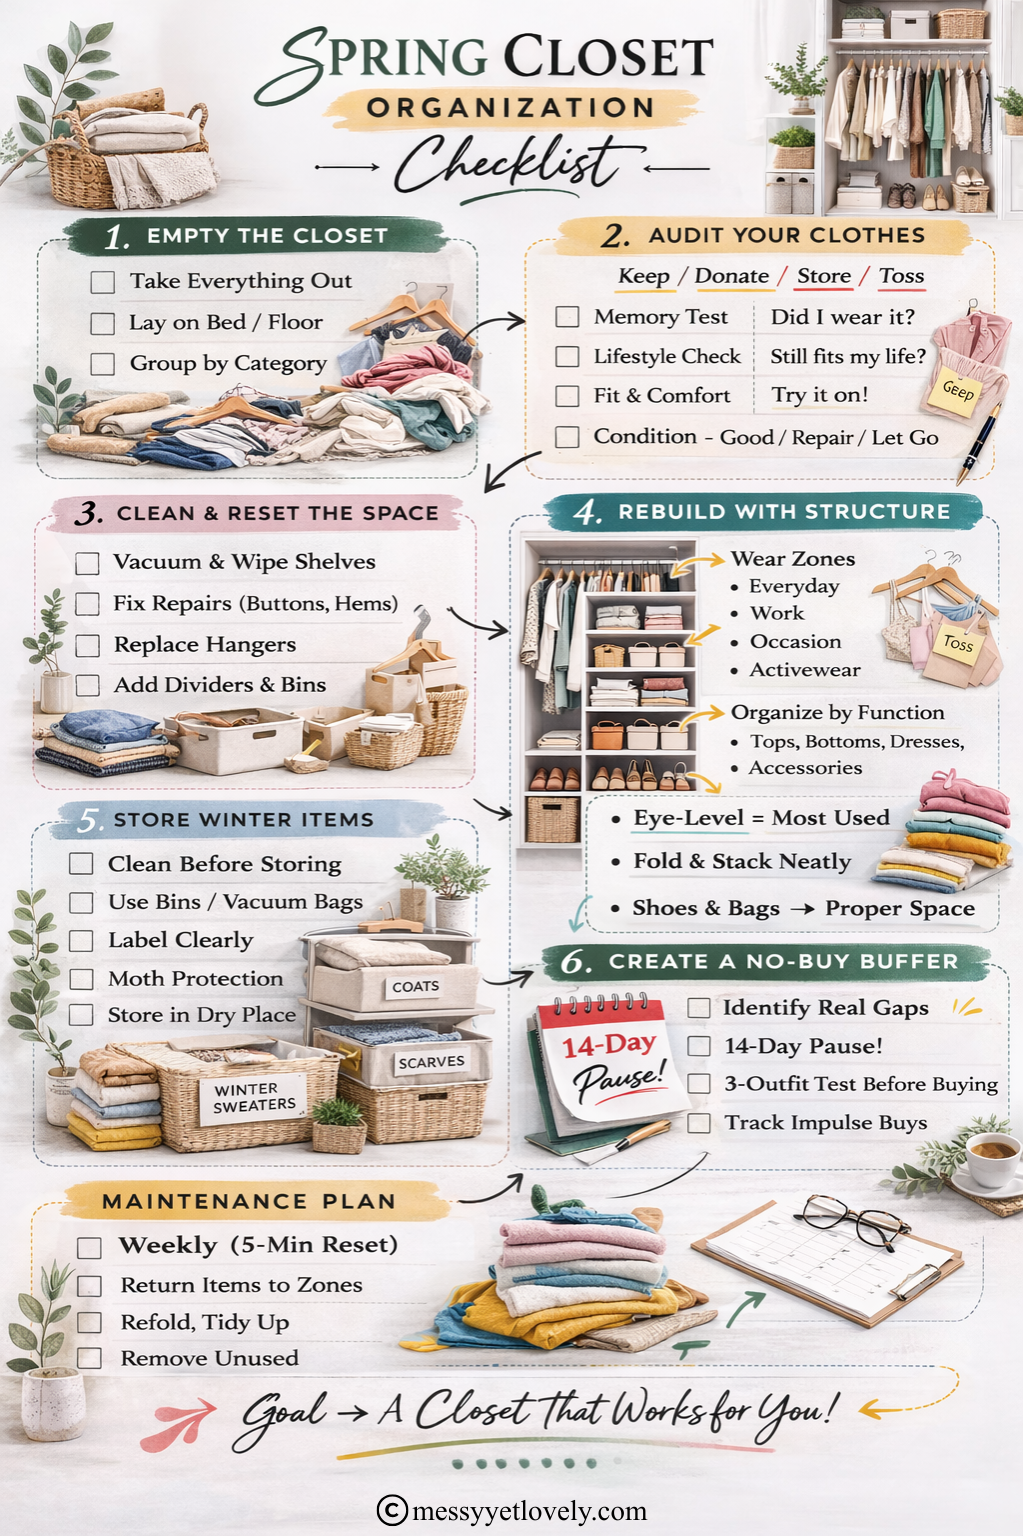
Spring Cleaning Checklist For Closets
This checklist follows six clear phases. And I suggest that you move through them in order.
1. Empty The Closet
This is not a surface tidy. This is a reset.
Take everything out
Remove all clothing, shoes, bags, and accessories. Yes, everything. When you empty the space completely, you see the true volume of what you own. That clarity changes how you make decisions.
Avoid sorting while pulling items out. First empty. Then evaluate.
Lay them on bed or the floor
Place items where you can see them clearly. Avoid stacking immediately.
Spread them out enough so all the items belonging to different categories are visible. Visibility helps to reduce decision fatigue.
Group by category
Now, create simple piles based on different categories, like:
- Tops
- Bottoms
- Dresses
- Activewear
- Occasion wear
- Outerwear
- Shoes
- Bags
Grouping by category shows duplicates instantly.
Three similar white shirts feel different when they’re hanging apart. Together, they tell the truth.
If you want to add more categories based on your possessions, feel free to do that.
2. Audit Your Clothes
Now you decide what stays.
Use this four-part evaluation method.
1. Memory Test – Did I wear it?
Try to recall wearing it last season. Not in theory, but in real life.
If you cannot remember reaching for it, ask why.
- Was it uncomfortable?
- Did it not match your lifestyle?
- Did you forget it existed?
Your habits reveal your real preferences, and this reflection will help you understand those.
2. Lifestyle Check – Does it still fit my life?
Your closet should reflect your current routines.
If your days are mostly school runs, work from home, gym sessions, or casual outings, your clothing mix should match that.
Keeping clothes for a version of you that no longer exists creates clutter. This is hard for many people as it involves deep emotional attachment.
Read the following posts to learn how to deal with it:
- How to stop hoarding clothes (A step-by-step plan to declutter your wardrobe)
- How to let go of clothes you are emotionally attached to
3. Fit And Comfort – Try it on
If you are doubtful about an item and are hesitating, try it on.
Sit. Move your arms. Walk around. Spring clothing should feel breathable and easy.
If something pinches, pulls, or needs constant adjusting, it will not get worn, and you know that deep in your mind.
Comfort drives consistency. And there are people out there for whom this item could be a perfect fit. You can think about letting go of such pieces here.
4. Condition – Good, Repair, Or Let Go
Inspect carefully. Do your clothes have-
- Loose threads
- Faded areas
- Stains
- Pilling
- Missing buttons
Create a small repair pile. If something has needed repair for months and hasn’t been fixed, be honest about your follow-through.
Do you really want to keep it, or has been procrastinating because of laziness or time constraints?

3. Clean and Reset the Space
Do not return clothes to a dusty closet. Here are some cleaning tasks to do before putting your clothes back.
Dust and vacuum shelves
Remove debris from corners and shelf edges. Vacuum the floor thoroughly. Clean the baseboards if needed.
Wipe down rods
Closet rods collect dust and residue. Wipe them before rehanging clothes.
Fix repairs immediately
If you created a repair pile, handle simple fixes now. Sewing a button takes minutes. On the other hand, waiting months adds to mental clutter.
Switch to matching hangers
Matching hangers create visual calm and prevent uneven spacing. Remove broken or extra hangers. Keep only what you need.
4. Rebuild with Structure
Now you place items back intentionally.
Organize by function
Instead of only sorting by type, sort by how you dress like,
- Everyday
- Work
- Occasion
- Activewear
This reduces decision fatigue because your closet mirrors your real routine, and all the items can be kept where they are easy to grab.
Create “Wear Zones”
Place frequently worn pieces at eye level. Items you wear less often can go higher or lower.
Accessibility increases usage, and this step will make sure you are using what you have.
Eye-Level equals frequent use
Be intentional about prime real estate. If something sits in the back corner, it becomes invisible, and it is easily forgotten.
Remember, your most-used items deserve the easiest access.
Fold and stack neatly
Keep folded stacks low enough to remove one item without collapsing the pile. Avoid overstuffing shelves.
Remember, neat does not mean perfect. It means functional.
If you have less space to make low stacks, use shelf dividers that will help you stack clothes on top of each other without falling to the side.
Shoes and bags – Designate proper space
Line shoes in pairs. Avoid stacking whenever possible. Store bags upright so they keep their shape.
If space is tight, use vertical dividers or slim organizers.

5. Store Winter Items
Before you move your winter clothes out of the closet, it’s worth slowing down for a minute and storing them properly.
Tossing everything into a box might clear space now, but it often leads to wrinkles, odors, or damaged fabrics later.
A little extra care at this stage makes next season’s switch much easier and keeps your closet feeling organized year-round.
Here are some tips to store your winter items:
Clean before storing
Wash or dry clean winter items before storing. Storing worn clothing traps odors and attracts pests.
Use breathable bins
Fabric bins or storage boxes allow airflow. Vacuum bags can work if space is limited, but avoid over-compressing delicate items.
Label clearly
Label storage bins so next season is easier. Simple labels reduce future stress.
Protect from moths
Use protective measures if needed. Keep storage in a dry area.
Store in a dry place
Moisture leads to damage. Choose a clean, dry storage location.
6. Create a “No-Buy Buffer”
After cleaning and organizing your closet, it’s completely normal to feel tempted to shop.
The space looks fresh, everything feels new, and suddenly it seems like you need a few more pieces to complete it.
Creating a small “no-buy buffer” helps you slow down, live with what you already own, and make more intentional choices before bringing anything new into your closet.
Identify real gaps
If you feel something is missing, write it down specifically.
Not “more tops.”
Instead: “One lightweight neutral cardigan that works with three outfits.”
Clarity prevents impulse shopping.
14-Day pause
Wait 14 days before buying anything new. During that time, build outfits from what you already own.
Often, the urge to shop fades when you start using what you have.
3-Outfit Test before buying
If you do buy something, ensure it creates at least three full outfits using items already in your closet.
If it cannot integrate easily, it will become clutter.
So, these are the 6 steps in the checklist and
Track impulse buys
Notice patterns. Do you repeatedly buy similar pieces?
Many of us have this tendency to buy certain types of clothes repeatedly. It creates duplicates, and you will never be satisfied because your preference for that color or fabric does not really change.
Awareness changes habits, and noticing this pattern is the first step toward making more intentional purchases and avoiding unnecessary clutter.
These are the six steps in this checklist. Each step may take a little time, but they are simple, actionable tasks that make a real difference when completed patiently.
When you have completed the cleanout, the next step is to create a maintenance plan so that all your efforts remain productive.
Let’s move on to it.

Maintenance Plan
A reset fails if it is not maintained. Without regular upkeep, clothes start shifting out of place, new items sneak in, and clutter quietly builds again.
Hence, let’s learn some maintenance actions to maintain your hard work.
Weekly Five-Minute Reset
Once a week:
- Return items to their designated zones so everything stays easy to find
- Refold or rehang anything that has become messy during the week
- Put away clothes that were left on chairs, beds, or hooks
- Remove items you avoided wearing and reconsider if they still belong in your closet
- Check for inside-out or wrinkled pieces and fix them immediately
- Place laundry back into the closet as soon as it’s clean instead of letting it pile up
- Straighten shoe pairs and return them to their proper spot
- Move frequently worn items back to eye level if they’ve shifted around
- Add any damaged clothing to a small repair pile instead of returning it to rotation
Small corrections like this prevent buildup.
Monthly Audit
Ask yourself:
- What did I wear most this month?
- What pieces did I keep reaching for without thinking?
- What did I avoid wearing, and why?
- What can I let go of now that I’ve tested it in real life?
- What felt uncomfortable or didn’t fit my lifestyle anymore?
- Did I buy anything I didn’t truly need?
- Are there duplicates I naturally ignored?
- What outfits worked effortlessly for me?
- What is actually missing from my closet right now?
- Is there anything that needs repair, cleaning, or replacement?
- Does my closet still reflect my current routine and season?
- What small adjustment would make getting dressed easier next month?
This keeps it aligned with your checklist philosophy: observing habits instead of forcing decluttering.
When you get used to asking these questions and stick to your decision of “avoiding unnecessary buying”, over time, you will learn to keep the closet clutter in check.
Remember the Goal
A closet that works for you, and does not create more stress.
It means getting dressed feels easier, impulse purchases become less tempting, and the clothes you own start to reflect your real lifestyle.
When you follow this checklist patiently, your closet won’t just look clean for a moment. It will continue to function smoothly in your everyday life.
Try the reset and let me know how it worked for you in the comments below. I am curious!
More posts:
- How to let go of clothes you are emotionally attached to
- What to do after decluttering your closet (So you don’t end up hoarding again)
- How to stop overbuying clothes & Build a closet you’ll actually wear
- 50 Closet Organization Hacks that’ll change how you use space forever
- How to declutter when you’re a hoarder (and don’t know where to start)
- What to do after decluttering your closet (So you don’t end up hoarding again)
- How to Declutter when you are stuck and overwhelmed with clutter